artista: MURALJOE
viernes, 17 de junio de 2016

miércoles, 15 de junio de 2016
tutorial de proporciones

 El primer paso es dibujar un óvalo cuya base sea mas estrecha que su punto más alto. Dibujamos tres líneas como indica la imagen.
El segundo paso es dibujar unas bases para los elementos de la cara. No hace falta hacerlo perfecto.
Recuerda que en total cabrían unos cinco ojos en la cara, y que la distancia que los separa es de un ojo.

 Borra las guías que hemos dibujado antes y comienza a darle detalle a tu rostro. La altura de la frente es la misma distancia de la nariz, y una boca (relajada) tiene cada extremo en la pupila del ojo.
Una vez ya tenemos la cara podemos comenzar a darle más detalle.
Estas guías también funcionan con otros ángulos, y pronto no necesitarán usarlas.


miércoles, 8 de junio de 2016
BRUSHES
Hey guys! Today I'm going to talk about different brushes, where to find them and how to use them.
 First of all: a brush is a painting tool which texture is different htan the simple plain circle that comes in every drawing program. There's a lot of them: watercolor brushes, oil brushes, charcoal, pastel, pencil, pen, ink... each o them will help us achieve different textures. There's an intended use for every brush, but there's no probloem in using them in a different way.
If you use FireAlpaca like me, you may want to find out a bit about "bitmap" brushes. Let's say you upload a black and white image: your computer will extract every black or dark pixel and make a brush out of that base. The opacity and flow can be modified later.

We can find these brushes on artist's packs, which are paid, or you can find them for free if you know where to look on the internet. Free brushes aren't as good as professional ones though.
Some programs even have the option of making your own brushes! It's a long process if you want it to turn out good. Personally I stick to those brushes i can find on google.
 Soem artists do share their brushes for free like great artist Pheberoni,
Some links:!
Paint Tool Sai
Photoshop
FireAlpaca
First of all: a brush is a painting tool which texture is different htan the simple plain circle that comes in every drawing program. There's a lot of them: watercolor brushes, oil brushes, charcoal, pastel, pencil, pen, ink... each o them will help us achieve different textures. There's an intended use for every brush, but there's no probloem in using them in a different way.If you use FireAlpaca like me, you may want to find out a bit about "bitmap" brushes. Let's say you upload a black and white image: your computer will extract every black or dark pixel and make a brush out of that base. The opacity and flow can be modified later.

We can find these brushes on artist's packs, which are paid, or you can find them for free if you know where to look on the internet. Free brushes aren't as good as professional ones though.
Some programs even have the option of making your own brushes! It's a long process if you want it to turn out good. Personally I stick to those brushes i can find on google.
 Soem artists do share their brushes for free like great artist Pheberoni,
Some links:!
Paint Tool Sai
Photoshop
FireAlpaca
Pinceles
Hola nenes! Hoy os voy a hablar sobre los pinceles en los programas digitales, cómo usarlos y dónde encontrarlos.
Primero: un pincel o brush digital es una herramienta de dibujo la cual tiene una textura diferente al típico círculo plano de los pinceles predeterminados. Hay una gran variedad de ellos: acuarela, témpera, óleo, tinta, esbozo... cada uno nos permite conseguir efectos diferentes. Aunque cada uno se ha hecho con una función en mente, no pasa nada si diferimos de su supuesto uso.
Depende que programa usemos debemos clicar en "upload bitmap". Si subimos cualquier imagen en blanco y negro, el ordenador seleccionará los píxeles más oscuros y creará con esa base nuestro pincel. Luego podemos modificar la opacidad.
Podemos encontrarlos o bien en packs de artistas de photoshop, los cuales hay que pagar, o bien algunos gratis en internet, claro que no suelen ser tan elaborados como los anteriores.
Algunos programas incluso tienen la opción de crearlos tú mismo! Es un proceso largo si quieres que te quede bien y no tienes experiencia. Por mi parte prefiero contentarme con los que encuentro por ahí.
Algunos artistas los comparten gratis, como la gran artista Pheberoni, aunque en este caso sólo son aptos para PS6. Os dejo unos links:
Paint Tool Sai
Photoshop
FireAlpaca
Primero: un pincel o brush digital es una herramienta de dibujo la cual tiene una textura diferente al típico círculo plano de los pinceles predeterminados. Hay una gran variedad de ellos: acuarela, témpera, óleo, tinta, esbozo... cada uno nos permite conseguir efectos diferentes. Aunque cada uno se ha hecho con una función en mente, no pasa nada si diferimos de su supuesto uso.Depende que programa usemos debemos clicar en "upload bitmap". Si subimos cualquier imagen en blanco y negro, el ordenador seleccionará los píxeles más oscuros y creará con esa base nuestro pincel. Luego podemos modificar la opacidad.
Podemos encontrarlos o bien en packs de artistas de photoshop, los cuales hay que pagar, o bien algunos gratis en internet, claro que no suelen ser tan elaborados como los anteriores.
Algunos programas incluso tienen la opción de crearlos tú mismo! Es un proceso largo si quieres que te quede bien y no tienes experiencia. Por mi parte prefiero contentarme con los que encuentro por ahí.
Algunos artistas los comparten gratis, como la gran artista Pheberoni, aunque en este caso sólo son aptos para PS6. Os dejo unos links:Paint Tool Sai
Photoshop
FireAlpaca
martes, 7 de junio de 2016
jueves, 2 de junio de 2016

miércoles, 1 de junio de 2016


martes, 31 de mayo de 2016


Flat Landscape Photoshop
The process is very simple on Photoshop: we use the lasso and colour inside the lines. Classifying every mountain chain in different layers will allow us to change its height (distance) and width. On the scripted patters there should be a tree we can make a forest with.
Tutorial de paisaje plano
El proceso es muy simple en photoshop: hacemos uso de la herramienta Lasso y coloreamos. Separar cada línea montañosa en diferentes capas nos permite modificar la altura (distancia) y ancho de cada una. Con la herramienta predeterminada de árbol (desgraciadamente sólo disponible en PS) podemos conseguir ese efecto de bosque tupido que es bastante difícil de conseguir con otros programas.
miércoles, 25 de mayo de 2016


Dibujo digital


FireAlpaca es un software de pintura de uso simple y sencillo. Se ha hecho posible su descarga completamente GRATUITA y está disponible tanto para Mac como para Windows. Siendo una interfaz mucho más simple, puede servirte para familiarizarte con el arte digital si no lo has probado antes.
martes, 24 de mayo de 2016
Libro: The Noble Approach


Con él podrás aprender sobre la comunicación visual, la teoría del color, cómo utilizar puntos de enfoque y figuras para atraer al lector...

No es un libro fino y contiene bastante teoría. Cada imagen enseña algo y eso lo valoro mucho.

Se lo recomiendo a cualquier artista, aunque especialmente a los amateurs que ya se sientan seguros con las bases del dibujo y quieran especializarse en campos más avanzados.
martes, 17 de mayo de 2016

Back to Basics
You may already know all of this if you've been interested on art for a long time. Just in case, here's a list of the basics to start creating in a more stable, regular way.
1. ADAPTABLE MATERIAL
You don't have to buy the most expensive pencils or the best sketchbook on sale to draw. The most important is to feel comfortable with what one's making use of, and if it takes the cheaper material and notebook paper, best for you and your wallet. In my case, I work with Faber-Castell material and a thick page sketchbook when i'm doing a "serious" piece, and when I'm not... i work with whatever I can find. Just create.
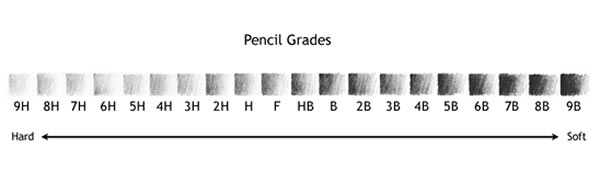
Keep in mind graphite is a tricky material to work with so you should look the hardness of your pencils up before you start. A harder pencil will be more discreet than soft pencils, and won't be prone to smudging.
Keep in mind graphite is a tricky material to work with so you should look the hardness of your pencils up before you start. A harder pencil will be more discreet than soft pencils, and won't be prone to smudging.
2. WORK PLACE
Your optimal work place will vary depending on the kind of person you are and how easily you feel isnpired. You may be able to work sorrounded by distracions, anytime and anywhere; or you may not be able to pick a pencil up until certain conditions are given. That's why it's important to experiment with different sorroundings in order to help you figure out what you feel most comfortable sketching in.
Placement aside, my advice is that you involve yourself with whatever inspires you. Pictures, books, music, other people's art, people itself... finding your own personal aesthetic is not hard at all and it will help you imporve your drawings. What you should not do is let yourself be influenced by what you think your source of inspiration should be.
Placement aside, my advice is that you involve yourself with whatever inspires you. Pictures, books, music, other people's art, people itself... finding your own personal aesthetic is not hard at all and it will help you imporve your drawings. What you should not do is let yourself be influenced by what you think your source of inspiration should be.
Quick advice: lots of artist make the mistake of letting themselves by what they think others want them to draw. You don't have to stick to drawing something just because your favourite artists do. It's the process of drawing what should feel pleasant, not just the final result.

(Fuente: Fia Celen)
3.REFERENCES
 There's a belief in the artistic community that using references is "cheating". That's an absolute lie. Plastic art is based on reproducing real life, and every artist need to do a previous study on what they wish to reproduce on paper or canvas. It's almost unavoidable: we do it without actually realizing it.
Anatomy books, photography books or even other people's artwork are great references you can use daily and will help you improve your perception of the real life world. This will be useful not only for realistic artists: if you like drawing in amore stylized way, you still should have an anatomic base to rely your drawing on.
Copying or tracing is another taboo existing in the artistic community, but it is in fact one of the most useful ways to get used to drawing a certain style or positioning object on paper. Most of the times, drawing from memory only will help us make the same mistake over and over again.
CAREFUL: with this i'm only alluding copying or tracing exclusively with learning purposes. Claiming other's artwork as yours is a degrading practice, wich is in fact a federal crime.
CAREFUL: with this i'm only alluding copying or tracing exclusively with learning purposes. Claiming other's artwork as yours is a degrading practice, wich is in fact a federal crime.
jueves, 12 de mayo de 2016


De vuelta a las bases
Es muy posible que ya sepas todo lo siguiente si llevas ya un tiempo dibujando o pintando, pero de todas formas he aquí un recordatorio de lo básico que se necesita para dibujar de manera más regular y segura.
1. MATERIAL ADAPTABLE
No hace falta que compres los lápices más caros ni el bloc de más calidad. La cosa es sentirse a gusto con lo que uno dispone, y si para ello te van bien los lápices del chino y el papel de cuadros, mejor que mejor. Personalmente, suelo trabajar con lápices Faber-Castell y un bloc de dibujo de hoja gruesa cuando es una obra importante, y cuando no lo es... pues lo que pille. Lo importante es crear.
Ten en cuenta que si trabajas con grafito te conviene mirar antes la dureza del lápiz. Cuanto más duro, más discreto será el trazo. Cuanto más blando, más denso y oscuro, pero es dado a borrones.
2. AMBIENTE
Esto depende mucho del tipo de persona que seas y de tu nivel de inspiración. Puede que seas capaz de ponerte a dibujar rodeado/rodeada de distracciones, en cualquier lugar y en cualquier hora; también puede que no te sientas capaz de hacerlo a no ser que se den unas condiciones concretas. Por esto es importante experimentar con ambientes variados, para averiguar que es lo que se adapta mejor a ti.
Lugar físico aparte, es recomendable que te rodees de cualquier cosa que te inspire. Fotos, libros, música, obras ajenas, personas, paisajes... Encontrar una estética personal no es para nada complicado y te sentirás mucho más a gusto cuando lo hagas. Lo que no debes hacer es dejarte influenciar por lo que crees que "debería" ser tu fuente de inspiración.
Un consejo: muchos cometen el error de dejarse influenciar por lo que creen que los demás consideran que deberían crear o dejar de crear. No porque tu artista favorito le guste dibujar una cosa quiere decir que tú tengas que hacer lo mismo. Es el proceso del dibujo lo que debe atraerte, no simplemente el producto final.
(Fuente: Fia Celen)
3.FUENTES
Hay una creencia en el mundo artístico que las referencias son una forma de hacer trampa: mentira. El arte plástico se sustenta de la reproducción de lo visual, y todo artista necesita realizar un estudio previo de lo que desee reproducir en papel: en muchos casos lo hacemos casi imperceptiblemente.
Los libros de anatomía, de fotografía o incluso otros dibujos son recursos que puedes utilizar diariamente y te ayudaran a que tu ojo se acostumbre a las proporciones del mundo real. Esto, en el caso del esbozo realista: si tu estilo es más caricaturesco, igualmente recomiendo que te hagas una base anatómica de la que luego puedas estilizar tus líneas.
Copiar o calcar es otro tabú existente en la comunidad artística. De hecho, esta técnica es una de las más útiles para acostumbrarse a posicionar los objetos en el papel. Muchas veces, dibujar de memoria puede hacer que cometamos el mismo error una y otra vez.
CUIDADO: con esto me refiero a copiar o calcar con motivos exclusivamente de aprendizaje. Plagiar una obra ajena y poner tu nombre encima es una práctica despreciable, que, de hecho, está penada por la ley.
miércoles, 11 de mayo de 2016
¯\_(ツ)_/¯
Hola, soy Lua, y este es un blog de arte creado principalmente para un trabajo de informática. Aquí iré colgando fotos, tutoriales o obras de otra gente que me hayan gustado, y también mías. Yo misma soy una amateur en esto del dibujo, así que ten esto en consideración si sigues mis guías.
Suscribirse a:
Entradas (Atom)